Google Analytics provides a lot of data. While having an overall portrait is necessary, sometimes, you might want to look at more specific pieces of information. This is when filters come in handy.
In order to filter your GAU data, whether it's when creating a new widget or editing an existing one, you can do this by accessing the Basic Settings of your widget. down the right syntax corresponding to your filter.
To help you create the right syntax filter, we've created this filter tool to guide you Google Analytics Filter Tool. Please note this tool is only suitable for GA Universal filters.
The rest of this article will help you better understand how the Google Analytics filter work and what it can mean.
2 – Filters for dimensions
3 – Filters for metrics
4 – Combination
5 – Multi-Channel Funnels filters
1 – Syntax
Filters in Google Analytics require a specific syntax, which looks like this: ga:country==Canada
If we replace each of the variables with their official terms, it looks like this: nameoperatorexpression
Name: This is the name of the dimension or metric you want to apply a filter to. For example, “ga:pageviews” will apply to the metric called “pageviews”. Filters are case-sensitive, so be sure that your capital letters are in the right place!
Operator: This is the formula that will be applied, such as: equal to, greater than, less than, etc. Take a look at the Filters for Dimensions and Filters for Metrics sections below to see which operators you can use in each case.
Expression: This is the value to which the operator applies in order to either include or exclude data.
In our previous example “ga:country==Canada”,
- “ga:country” is the name;
- “==” is the operator;
- “Canada” is the expression.
2 – Filters for dimensions
There are six operators you can use in order to filter dimensions.
| Operators | Descriptions | Examples |
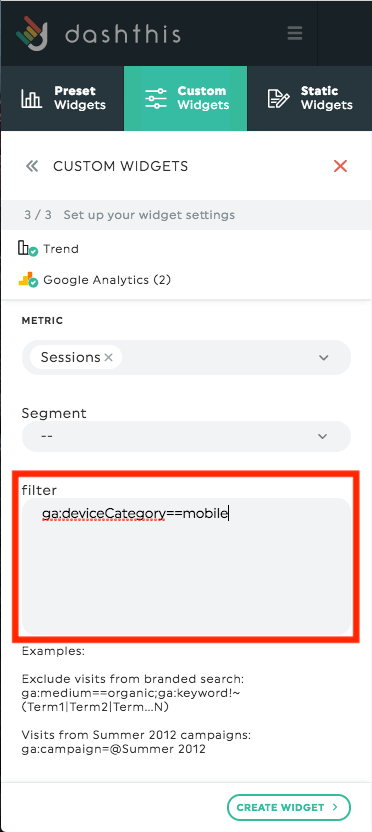
| == | Exact match | Includes data that exactly matches the expression. Ex: The filter “ga:deviceCategory==mobile” will only display data related to mobile. |
| != | Does not match | Excludes all data that doesn’t exactly match the expression. Ex: The filter “ga:campaign!=CampaignName” will discard all data related to the campaign called CampaignName. |
| =@ | Contains substring | Includes all data that contains the expression. Ex: The filter “ga:country=@land” will display all data for countries containing “land” in their name, such as England, Ireland, Scotland, etc. |
| !@ | Does not contain substring | Excludes all data that doesn’t contain the expression. Ex: The filter “ga:campaign!@Spring” will exclude all campaigns containing “Spring” in their name. |
| =~ | Contains a match for the regular expression* | Includes all data that contains any of the terms in the expression. Ex: The filter “ga:campaign=~(s|S)pring” will include all campaigns containing “spring” or “Spring” in their name. |
| !~ | Does not match regular expression* | Excludes all data that doesn’t contain any of the terms in the expression. Ex: The filter ga:campaign!~(s|S)pring will exclude all campaigns containing “spring” or “Spring” in their name. |
*Regular expressions have multiple functions and can easily become complex. In the context of writing a Google Analytics filter, you probably won’t need to dive too deeply into formulas and endless options.
If you want to learn more about regular expressions, explore the Google Analytics guide.
3 – Filters for metrics
There are six operators you can use in order to filter metrics.
| Operators | Descriptions | Examples |
| == | Equal to | Returns data that is equal to the expression. Ex: ga:uniquePageviews==5 will only show results where the number of pages viewed is equal to 5. |
| != | Does not equal | Returns data that is different from the expression. Ex: ga:pageviewsPerSession!=1 will only show results where the number of pageviews per session is not equal to 1. |
| > | Greater than | Returns data that is greater than the expression. Ex: ga:timeOnPage>60 will only show results where the user spent more than 60 seconds on a page. |
| < | Less than | Returns data that is less than the expression. Ex: ga:sessionDuration<30 will only show results where the sessions lasted less than 30 seconds. |
| >= | Greater than or equal to | Returns data that is greater than or equal to the expression. Ex: ga:impressions>=100 will only show results where the impressions are greater than or equal to 100. |
| <= | Less than or equal to | Returns data that is less than or equal to the expression. Ex:ga:pageviews<=100 will only show results where the pageviews are less than or equal to 100. |
4 – Combination
It’s possible to combine filters to personalize the query even more. You can combine them either with an AND or an OR.
The OR operator is the comma ( , ). “ga:country==canada,ga:country==australia” means the query will return results that are either Canada OR Australia.
The AND operator is the semicolon ( ; ). “ga:country==canada;ga:deviceCategory==Mobile” means the query will return results that are related to Canada AND mobile devices.
5 – Multi-Channel Funnels filters
If you want to apply a filter on multi-channel funnel metrics, the filter syntax is going to change a little bit. Instead of beginning with ga, the filter has to start with mcf.
The result would look like this: mcf:source==facebook. Again, those filters are also available in our Google Analytics Filter Tool if you want to know how to write the syntax. Learn more.
Should you need any assistance with Google Analytics Universal filters, please reach out to our Support Team 🤘
What's next:
Google Analytics Universal notes/limitations